ezc203 Posted August 2, 2013 Share #1 Posted August 2, 2013 Advertisement (gone after registration) Just recently received a Leica Monochrom. Still getting used to it. Right now my "Henri" set-up is a 50mm pre-ASPH Lux with a heavy ND filter and shooting wide-open as much as possible. My question to the forum is how are people editing their Monochrom DNGs? I usually use Lightroom 4 for my M9 picture, but I'm not exactly satisfied with what I'm getting right now with my currently post processing. Any tips? Any suggests? I'm all ears! Cheers! Link to post Share on other sites More sharing options...
Advertisement Posted August 2, 2013 Posted August 2, 2013 Hi ezc203, Take a look here Post Process (Monochrom). I'm sure you'll find what you were looking for!
Laki Posted August 2, 2013 Share #2 Posted August 2, 2013 try the software which is bundled, silver effex pro Link to post Share on other sites More sharing options...
Luke_Miller Posted August 2, 2013 Share #3 Posted August 2, 2013 I like to add a structure adjustment to my Monochrom images. Lightroom does not have a structure tool, but the Silver Efex plugin provides one. Capture One 7 also has one. Link to post Share on other sites More sharing options...
sanyasi Posted August 2, 2013 Share #4 Posted August 2, 2013 I typical make the ACR adjustments in Bridge (except curves). I next open the image in Photoshop and apply the Shadows and Highlights adjustment (which cannot be done as a layer) and then apply a Curve. If I am going to crop or straighten or eliminate convergent lines, I do that in Photoshop, but with the new Photoshop CC I am finding the tool in ACR can fix a lot of those problems quickly. Then I open the image in Silver Efex. I have a number of SE filters that I like--Fine Art and Push in particular. I apply these first. Then I tweak the adjustment with the individual sliders on the right. It is recommended that you not use the global Brightness and Contrast adjustments, but use the more specialized subset adjustments sliders below them--it is the difference between a hammer and a fine chisel. At that point, I will do limited dodging and burning with control points--usually on skin and faces. I often try the Lens Fall Off setting under vignettes, which in mind results in darker edges and more contrast. On occasion, I will use the Agfa film style and every once I burn an edge or use toning--usually very moderate on the toning and not that often. I then bring the image back into Photoshop. If necessary, I will add an Overlay layer for more precise dodging and burning using the white and black brushes. When using this, the Fade feature is very useful. If necessary, I then noise reduce using the Nik tool and Sharpen tool using the Nik tool. Sometimes I rely on the default settings in ACR. If I apply more sharpening, I do so selectively by using opacity control points. I find that noise reduction is often not necessary. At that point, I save the image in psd format if I think I will go back and make adjustments--don't flatten or merge layers. If I am going to print the image, I also save it as a layerless tif file and I make a jpg to put on my website. All of the foregoing can be done quickly, but if I get into dodging and burning, I can go crazy in terms of minor edits, which takes time. I print in ImagePrint. I am not fanatical about this. The other night I went to a demonstration. In keeping with the photojournalist credo, I made minimum adjustments. ACR, Shadows and Highlights and then some contrast adjustments in Silver Efex. No sharpening or noise reduction. Hope that helps. Jack Siegel P.S. Writing this out was kinda fun. There is a method to my personal madness. Link to post Share on other sites More sharing options...
250swb Posted August 2, 2013 Share #5 Posted August 2, 2013 I like to add a structure adjustment to my Monochrom images. Lightroom does not have a structure tool, but the Silver Efex plugin provides one. Capture One 7 also has one. I don't know how ACR is arranged in Lightroom because I use Photoshop, but the 'Clarity' slider does the same sort of job. The advantage of Silver Efex of course is that you can adjust the Structure selectively, and I usually only touch the mid-tone and shadow sliders and avoid the highlight slider. This gives more mellow transitions in the higher key areas, much like film does in the way tones gradually roll off into the highlights. I aim to match the same sort of tonality that I get from large format negatives and the MM is the first digital camera that gets even close. Steve Link to post Share on other sites More sharing options...
skinnfell Posted August 4, 2013 Share #6 Posted August 4, 2013 Hello! First of all. LR4 is IMO not the right tool to process Monochrom files. I get the feeling that it is designed for high dynamic range color CMOS sensors , or in other words, 99.99% of the other cameras on the market. Good thing then, that Lightroom 3 is my favorite tool to work monochrom files. Even better is, LR4 can emulate LR3 by going to the bottom of the develop menu and choosing "Process 2010" instead of 2012. My processing philosophy is always to process as gently as possible. I sometimes have photo students following me around and I always tell them that: post processing is like salt. A little is better than nothing, but too much renders it inedible. Here is my workflow. 1.First of all, make sure your image is correctly exposed, (if not, use the exposure slider). The starting point should be an as flat image as possible without clipped highlights or shadows. I usually tell the students to think of the histogram as a mountain. We want the whole mountain. If you cannot see the left or right foot of the mountain then your image is respectively underexposed or overexposed. 2. In my processing mind, first I want to relax the highlights. I usually start by setting Recovery to 50%. Recovery is one of the most important settings that got lost in LR4/2012 process. The dual highlight sliders in LR4 do not work the same way and are too heavy handed if you ask me. Leave Brightness and Contrast at respectively 50 and 25. 3. I want to bring out the shadows, so I usually set the Fill light slider to about 25. Anything over 20 or so seems to ruin a a color image (IE make it look like HDR) but on the monochrom files it works like a charm. 4. By now I have a fairly light grey flat image and I want to put some pop in the shadows. I start by pulling the Blacks slider up until I have some blue spots showing up, in this case to around 25 . 5. If I still desire some additional "pop" I will adjust the Lights and Darks sliders. In this case I will just want some additional darkness, so I set the Darks to -25. And lights to +25. This is where image content will make the most difference. I usually never touch the Highlights and Shadows sliders. Sometimes a little vignetting control is called for. I dial this in, the Lens corrections, Manual, Lens vignetting, and set the midpoint to either extreme, for a most possible gradient vignetting. I wouldnt normally do this on an image like this, but for this image and demonstrational purposes I have used Amount=-40, Midpoint=0 Finally. Since the JPG files are exported as RGB no matter what, and since most computer screens are somewhat cold, I prefer to add a very slight warm toning to my pictures. In split toning, try these values on BOTH highlights and shadows: HUE=47 saturation=2. (This equals roughly Pantone Warm Grey #1 in photoshop). Sometimes I will export the file as a DNG with my settings embedded, or make a TIFF file, sometimes a 2000px JPG file for screen viewing. I never sharpen or add clarity until I know exactly how the image will be displayed. A large print on matte paper requires a lot more and different sharpening than a 900px web preview.I never sharpen in Lightroom, always in Photoshop. Sharpening and printing are two sides of the same story so we will leave that for later. TIP: I have stored these settings as my default settings for this camera, so every time I import a monochrom image LR will make these adjustments for me. PS. Sorry for the boring example picture, I cannot post anything that is going to be published later. Hope this was useful and Good luck! Welcome, dear visitor! As registered member you'd see an image here… Simply register for free here – We are always happy to welcome new members! Link to post Share on other sites Simply register for free here – We are always happy to welcome new members! ' data-webShareUrl='https://www.l-camera-forum.com/topic/210067-post-process-monochrom/?do=findComment&comment=2390421'>More sharing options...
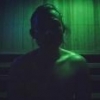
skinnfell Posted August 4, 2013 Share #7 Posted August 4, 2013 Advertisement (gone after registration) And finally, If depending on the story, I will dodge and burn the parts I want to accentuate. LEts just assume we want a dark and moody atmosphere today, then we get this: Welcome, dear visitor! As registered member you'd see an image here… Simply register for free here – We are always happy to welcome new members! Link to post Share on other sites Simply register for free here – We are always happy to welcome new members! ' data-webShareUrl='https://www.l-camera-forum.com/topic/210067-post-process-monochrom/?do=findComment&comment=2390428'>More sharing options...
Recommended Posts
Archived
This topic is now archived and is closed to further replies.