jlm Posted November 10, 2007 Share #61 Posted November 10, 2007 Advertisement (gone after registration) rthe screw is set a bit below the surface; the zeiss flnages are like this and paint right over jm Quote Link to post Share on other sites More sharing options...
Advertisement Posted November 10, 2007 Posted November 10, 2007 Hi jlm, Take a look here Zeiss 18 Distagon Question. I'm sure you'll find what you were looking for!
sean_reid Posted November 10, 2007 Share #62 Posted November 10, 2007 rthe screw is set a bit below the surface; the zeiss flnages are like this and paint right over jm Exactly. John, I'm back in VT and should be able to have the mount Monday. Thanks. Cheers, Sean Quote Link to post Share on other sites More sharing options...
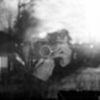
Philippe D. Posted November 10, 2007 Share #63 Posted November 10, 2007 Alright, i have modified the adapter 58-55 so i could use the Leica IR 55 filter on the Distagon 18mm instead of a 58mm Hoya Skylight 1a. The flange of the Zeiss optic is not coded. Here the 1/4 high-right part of pictures with no other modifications than the color temp. which was a real 5500°K (Gossen Sixticolor) but seen as 7400°K by the M8 on Auto White Balance (FW v.1.110) and JPG transfer. Welcome, dear visitor! As registered member you'd see an image here… Simply register for free here – We are always happy to welcome new members! 18mm 1a Hoya Skylight 18mm Leica IR The cyan drift is much more obvious with the IR filter (although not coded lens). I'm curious to see some results with a coded lens. Quote Link to post Share on other sites Simply register for free here – We are always happy to welcome new members! 18mm 1a Hoya Skylight 18mm Leica IR The cyan drift is much more obvious with the IR filter (although not coded lens). I'm curious to see some results with a coded lens. ' data-webShareUrl='https://www.l-camera-forum.com/topic/35629-zeiss-18-distagon-question/?do=findComment&comment=398723'>More sharing options...
Guest guy_mancuso Posted November 10, 2007 Share #64 Posted November 10, 2007 Mine will be here Monday morning. Sean and I both will have them on Monday. Quote Link to post Share on other sites More sharing options...
sean_reid Posted November 12, 2007 Share #65 Posted November 12, 2007 John's bayonet arrived today and I mounted it on the Zeiss 18 without any problem (thanks to the gradual acetone technique). The M8 does detect the lens as a WATE and focus seems unchanged after the bayonet replacement. I should have white chart tests (cyan drift and vignetting when coded) done in the next couple of days. Cheers, Sean Quote Link to post Share on other sites More sharing options...
MJones Posted November 13, 2007 Share #66 Posted November 13, 2007 (thanks to the gradual acetone technique). Cheers, Sean Would you elaborate on the "gradual" portion of the acetone technique for removing the Zeiss flange screws? I've seen comments about applying a drop of acetone but am curious about the gradual part. I have not tried removing a zeiss flange myself. My new ones are one the way from Milich. Thank you Quote Link to post Share on other sites More sharing options...
sean_reid Posted November 13, 2007 Share #67 Posted November 13, 2007 Advertisement (gone after registration) John's technique is to begin by letting some acetone run from the screw slot down into the thread, soak for a minute, then loosen a couple of turns, more acetone, soak for a minute, loosen a little more, etc. It worked like a charm. Cheers, Sean Quote Link to post Share on other sites More sharing options...
MJones Posted November 13, 2007 Share #68 Posted November 13, 2007 John's technique is to begin by letting some acetone run from the screw slot down into the thread, soak for a minute, then loosen a couple of turns, more acetone, soak for a minute, loosen a little more, etc. It worked like a charm. Cheers, Sean Thank you. I'll try this out shortly. Quote Link to post Share on other sites More sharing options...
wlaidlaw Posted November 13, 2007 Share #69 Posted November 13, 2007 Thank you. I'll try this out shortly. In my experience from both doing a Zeiss lens and years of undoing thread locked bolts on racing cars, it helps if after applying the acetone and undoing a couple of turns, you add a touch more acetone and then tighten the screw again. This carries the acetone into previously dry and sticky parts of the thread. You then undo to the previous point and as Sean said leave a couple of minutes and undo all the way. I cannot emphasize enough how important it is to have the correct size and jewelers quality screwdriver or you will risk chewing up the screws. Wilson Quote Link to post Share on other sites More sharing options...
atufte Posted November 13, 2007 Author Share #70 Posted November 13, 2007 My screws loosen just fine without any liquid what so ever, i even did this on 3 Zeiss lenses so far, and everyone loosen without any problem... is this normal or am i just lucky? What i did was i filed down a larger screwdriver to fit the screws, to get some more drag than the small "watchmaker tools", maybe this did the trick...? Quote Link to post Share on other sites More sharing options...
jlm Posted November 13, 2007 Share #71 Posted November 13, 2007 i have twisted off the top of a couple of screws on Zeiss flanges; they were tight, but started to turn then snapped. a real PIA. Quote Link to post Share on other sites More sharing options...
sean_reid Posted November 13, 2007 Share #72 Posted November 13, 2007 In my experience from both doing a Zeiss lens and years of undoing thread locked bolts on racing cars, it helps if after applying the acetone and undoing a couple of turns, you add a touch more acetone and then tighten the screw again. This carries the acetone into previously dry and sticky parts of the thread. You then undo to the previous point and as Sean said leave a couple of minutes and undo all the way. I cannot emphasize enough how important it is to have the correct size and jewelers quality screwdriver or you will risk chewing up the screws. Wilson Hi Wilson, That's a good idea and, as I think about it, may have been part of John's recommendation as well (though I forgot to do it). Cheers, Sean Quote Link to post Share on other sites More sharing options...
MJones Posted November 13, 2007 Share #73 Posted November 13, 2007 When putting the flange back on, is there any reason to ad lock-tite (sp?) back in with the screw? I figured the lock-tite was kind of over doing it on Zeiss part but maybe there's a good reason other than the obvious belt and braces approach. Quote Link to post Share on other sites More sharing options...
Vieri Posted November 13, 2007 Share #74 Posted November 13, 2007 My screws loosen just fine without any liquid what so ever, i even did this on 3 Zeiss lenses so far, and everyone loosen without any problem... is this normal or am i just lucky? What i did was i filed down a larger screwdriver to fit the screws, to get some more drag than the small "watchmaker tools", maybe this did the trick...? Same here - did change flanges on 4 Zeiss lenses without any problem, no broken screws or anything of that sort. Another lucky man I guess Quote Link to post Share on other sites More sharing options...
wlaidlaw Posted November 14, 2007 Share #75 Posted November 14, 2007 When putting the flange back on, is there any reason to ad lock-tite (sp?) back in with the screw? I figured the lock-tite was kind of over doing it on Zeiss part but maybe there's a good reason other than the obvious belt and braces approach. Remember over its lifetime, you may be mounting and unmounting this lens hundreds of times plus it is bouncing around in your bag. Murphy's law of bolts states that any bolt which can come undone, will do so at the most inconvenient time. It will then chew up the mount on your M8. When you are using thread locker, use the very lowest strength (it usually comes in three or four grades) or you will never get these screws undone again. They are only 1mm screws and very easily sheared. Wilson Quote Link to post Share on other sites More sharing options...
MJones Posted November 14, 2007 Share #76 Posted November 14, 2007 Remember over its lifetime, you may be mounting and unmounting this lens hundreds of times plus it is bouncing around in your bag. Murphy's law of bolts states that any bolt which can come undone, will do so at the most inconvenient time. It will then chew up the mount on your M8. When you are using thread locker, use the very lowest strength (it usually comes in three or four grades) or you will never get these screws undone again. They are only 1mm screws and very easily sheared. Wilson Better safe than sorry. Where should locktite be applied for best fit? Does it go on threads only and then tighted in screw? or a drop on head after screwed in flush? Or something in between/ Thank you Quote Link to post Share on other sites More sharing options...
wlaidlaw Posted November 14, 2007 Share #77 Posted November 14, 2007 Better safe than sorry. Where should locktite be applied for best fit? Does it go on threads only and then tighted in screw? or a drop on head after screwed in flush? Or something in between/ Thank you Michael, Put a TINY amount on the thread of the screw prior to screwing in. If you can imagine enough to cover about half the length of the thread and one third of its circumference - that is plenty. Then wipe off any surplus after you have screwed in the screw. I am lucky enough to have a micro torque screwdriver, which I set to the correct torque for a 1mm soft steel screw (remembering it is seating in an alloy female socket). Otherwise just screw in firmly but don't "gorilla" it. Wilson Quote Link to post Share on other sites More sharing options...
MJones Posted November 14, 2007 Share #78 Posted November 14, 2007 Michael, Put a TINY amount on the thread of the screw prior to screwing in. If you can imagine enough to cover about half the length of the thread and one third of its circumference - that is plenty. Then wipe off any surplus after you have screwed in the screw. I am lucky enough to have a micro torque screwdriver, which I set to the correct torque for a 1mm soft steel screw (remembering it is seating in an alloy female socket). Otherwise just screw in firmly but don't "gorilla" it. Wilson Makes sense. Sort of like greasing a bolt. I can use a modeling brush to apply to the threads. Thanks for the tips - very helpful. Is there is best size on the screw driver - I've seen rec's to use a jewlers drivers. A torgue screwdriver would be nice though. I've got 3 lenses to change out; I might look into a micro torque screwdriver. I've spent more than I planned getting into Leica what's a little more for a screw driver? Thanks Quote Link to post Share on other sites More sharing options...
sean_reid Posted November 14, 2007 Share #79 Posted November 14, 2007 Michael, I am lucky enough to have a micro torque screwdriver, which I set to the correct torque for a 1mm soft steel screw (remembering it is seating in an alloy female socket). Wilson Ooh...put that on my Christmas list. Cheers, Sean Quote Link to post Share on other sites More sharing options...
wlaidlaw Posted November 15, 2007 Share #80 Posted November 15, 2007 Ooh...put that on my Christmas list. Cheers, Sean You'll be lucky! Mine was made about 50 years ago by a British company called Moore and Wright that I don't know if it even exists any more. I have never seen another one. Mine is out on loan against a fat deposit cheque at the moment, since I have no need of it on my medical tourism trip to South Africa. No return of torque driver - cheque gets cashed! Wilson Quote Link to post Share on other sites More sharing options...
Recommended Posts
Join the conversation
You can post now and register later. If you have an account, sign in now to post with your account.
Note: Your post will require moderator approval before it will be visible.