Search the Community
Showing results for tags 'maintenance'.
Found 3 results
-
 Hi, Yesterday I brought home a Leica M6 with a Summicron 50mm Type 5 (built-in hood). It's my first Leica camera and lens. Both seem to have had little use, they are in very good cosmetic condition, little wear... When I got home last night, upon close inspection of the lens under a lamp, I noticed something I hadn't seen before buying. On the edge of the front element, when light was hitting at a very specific angle, one could see marks or stains, can't quite describe it, around most of the edge, almost like it was lubricant. At first I thought it was on the outside, and I cleaned it, but it remained, that's when I realized it was on the inside of the front element. I couldn't resist the temptation, and tried to unscrew the ring with the lens description. It unscrewed, so I carried on exploring... Undid a retaining ring after that, and the front group came out. Another ring on the back of the front group, unscrewed that, and the front group divided in two, and you can reach the back of the front element. So I cleaned the back of the front element, with standard lens cleaning fluid, and it appears to have worked, the lens seems perfectly clean with no marks whatsoever. Reassembled it with caution and it's on the camera, which is halfway through the first roll... Still haven't bought the adapters for my digital cameras. After I did it, doubt started to creep in... Could that have been some kind of coating on the inside of the front element? Could I have removed it just by cleaning? The only time I saw coating damage was in an old Mamiya TLR lens, the coating was kind of peeling off around the edges, but it looked different, it had an edge to it, and kind of chipped off. In the Leica it wasn't like that, it looked stained, smudged almost, no edge to it. Does anyone know if this lens has any coating on the inside of the front element that is sensitive enough to damage by cleaning like this? I also read a thread here that states that all inner coatings since 1960's are hard, and not likely to be damaged by simple cleaning... I hope that stands true in this case... It seemed to me that the front-side of the back element from this front group indeed was coated, but I did not touch that, as it was clean and perfect. Any insights are appreciated... Thank you very much!
 -
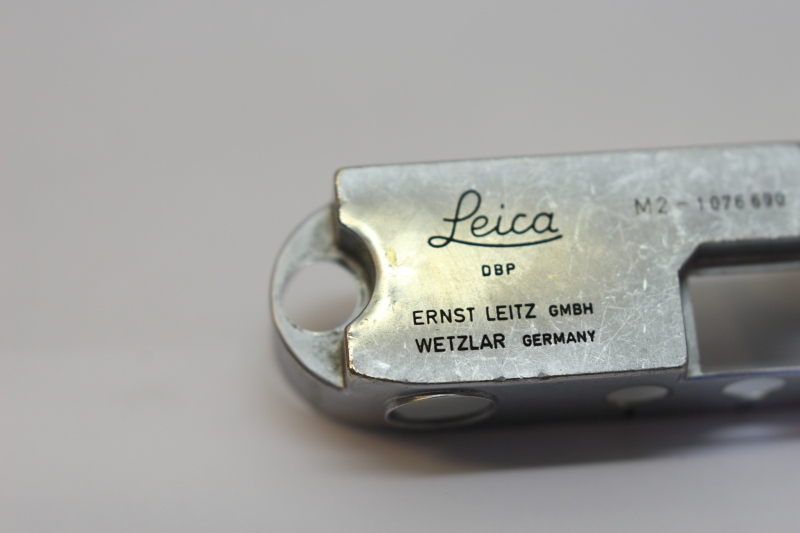
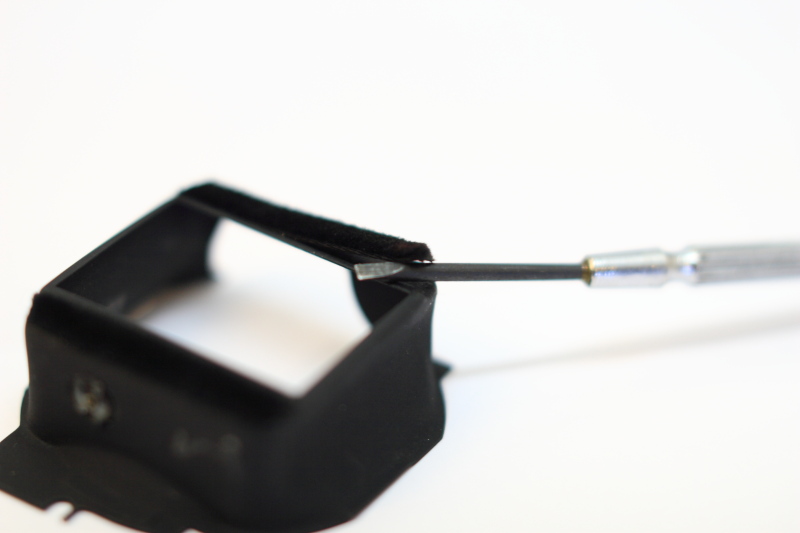
This may be ofensive to some, but I repaired my own M2. The upper felt seal on the light shield came loose, and jammed the second curtain. A common fault, which was obvious, just looking in the back. I got a couple of estimates for repair/CLA, but €300-500 seemed a poor investment for a beat up body which I'd paid €250 for, and use much less than the M8. Didn't do a 4 1/2 year mechnical apprenticeship for nothing, so I made my own ring spanners with the lathe and some filing, and and fixed it myself. While I was in there I also cleaned the exposed surfaces of the rangfinder and frame line mirror, and the rangefinder is much brighter and frame lines crisper than before. The cement on the light baffle infront of the frame line mirror had released, so I recemented it. The little spring on the frmae line selector mechanism was deformed (it fell out - I didn't damage it removing the body shell). Reformed the hook on that spring and reinstalled it. There was an ugly bulge in the top plate, so I smoothed that out also. For instructions, the Leica Notes PDF, and the 1950's US Army M2 repair manual pdf's were invaluable. I didn't diassemble further than removing the light shield, but nothing visible displayed any obvious wear. The camera is back in service, no light leaks, much clearer, better adjusted, rangefinder, working better than before.

- 10 replies
-
- 9
-

-
- light shield
- maintenance
- (and 3 more)
-
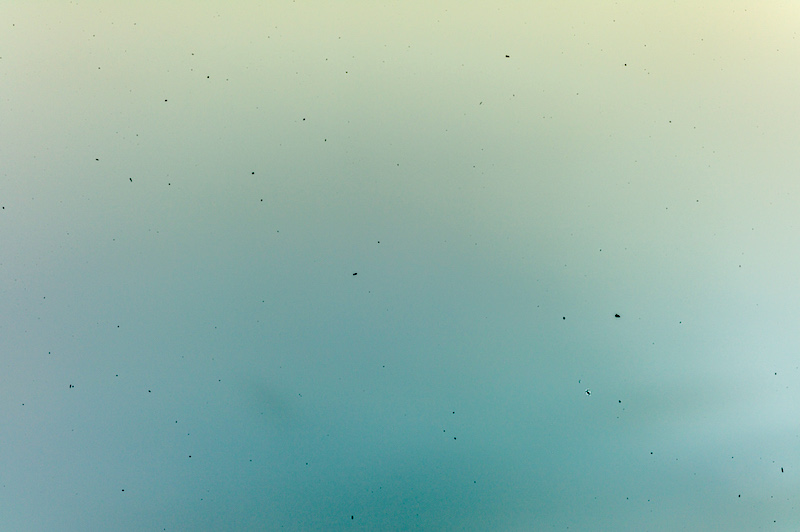
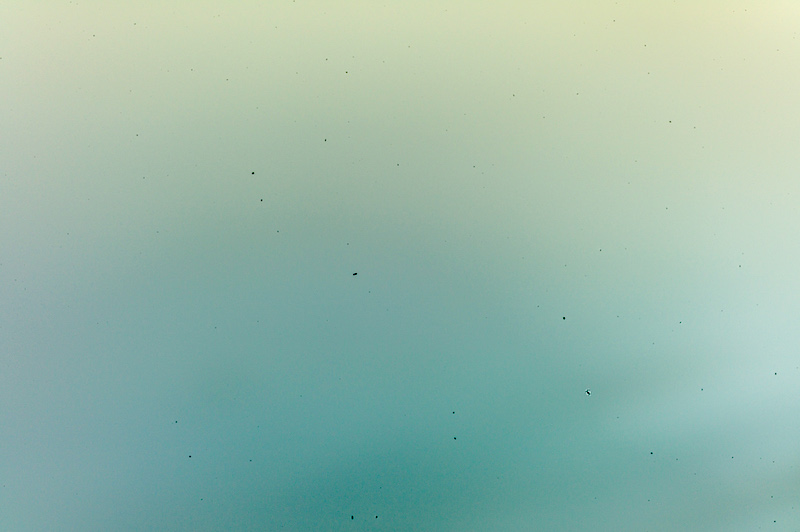
Hello everyone. I'm a long-time M photographer who just joined this forum. My first M was a 6, followed by an 8, then a 9 and most recently a 10. I really love the M9 and my camera is one of the early production ones and in original condition (never repaired or had anything replaced.) I've not cleaned the sensor for about 5 years and today finally took the time to do so. The images in this post have been processed in Lightroom to add as much contrast as I could to increase the visibility of specs and dust. The small images inline in this post have had "auto levels" applied, so they are extremely compressed, greatly exaggerating the particles. Link to full-res images at end of post. I started with a reference shot against a light grey wall, summicron 50 at f16 out of focus. Pretty damn dirty: First round of cleaning was with a rocket blower. This got rid of quite a lot of minor dust particles: Second round of cleaning was with a VisibleDust Arctic Butterfly statically-charged brush, which got rid of a new "class" of particles: However there were still a few "sticky" particles left. Final round was wet cleaning with swabs of Eclipse. This is a really scary step as it's easy to make mistakes, but I managed to not screw up: There's now just a single impossible-to-get-rid-of spec (even after five Eclipse swabbings), and I can live with that one. Pretty remarkable how much cleaner the sensor is after this. Strongly recommend taking an hour out of your life to clean you sensor (very carefully) :–) Full-res images (lightly compressed and processed to increase particle visibility): https://www.dropbox.com/sh/0q9tht2js82u1zs/AAB6M-98wkRWTfmDtTke-duha?dl=0 Equipent used: Giottos AA1900 Rocket Air Blaster VisibleDust Arctic Butterfly 724 VisibleDust Quasar R 5x Sensor Loupe Photosol Sensor Swab ULTRA (24mm) Photographic Solutions Eclipse fluid